Pages

Monday, March 31, 2014

Fish hats, fish hats, roly poly fish hats

 A couple of years ago I had a student who pronounced the letter f with a "b" sound.  One morning she came in singing a new song: "Bish eds, bish eds, oly oly bish eds.  Bish eds, bish eds, eat dem up yum!"  I had no idea what she was singing, but another parent recognized it as "Fish Heads" by Barnes and Barnes, so we all watched it, and it became a sort of class song.
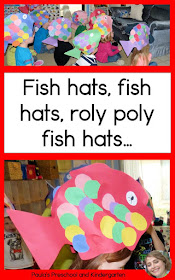
Fish hats, fish hats, roly poly fish hats from Paula's Preschool and Kindergarten
I was tickled to find an idea for a fish hat recently, at www.abbythelibrarian.com, and had to use it for our letter f review day.  The original author even included a reference to "Fish Heads", so how could I resist?

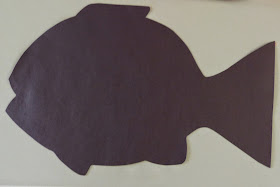
Here is my modified version.  I used 12" x 18" construction paper to make our fish, as I had some on hand.  I drew out a fish shape, making sure the body of the fish was about 12 inches long - I wanted to be sure that two fish bodies would fit all the way around the children's heads.  From all the scraps my assistant and I cut lots of circles to represent scales.
Fish hats, fish hats, roly poly fish hats from Paula's Preschool and Kindergarten

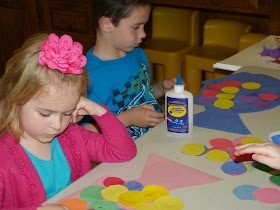
Each child decorated two fish, one facing left, the other facing right.  They glued the scales on in an overlapping pattern.  We needed many more scales than I had anticipated - if you decide to do this project, expect each child to need about 40 - 50 large scales.  
Fish hats, fish hats, roly poly fish hats from Paula's Preschool and Kindergarten

 We stapled a sentence strip to fit each child's head, then stapled on their fish.  **When you staple, be sure to put the smooth side of the staple to the inside so the sharp ends are away from kids' heads.**
Fish hats, fish hats, roly poly fish hats from Paula's Preschool and Kindergarten
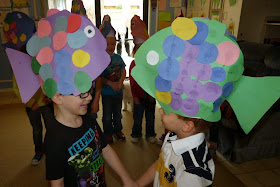
 When everyone was ready, we watched Fish Heads one more time, and sang along in our own fish heads.  Aren't they adorable?!


Saturday, March 29, 2014

Exciting E

 It is still 3 full weeks until Easter, but  I can't think of anything better to review the letter E.  First of all, it is meaningful to the children.  Between "Easter" and "eggs" we have both the long and short vowel sounds.  There are many, many terrific books about it, and of course, any number of fun Easter things to play and learn with. 
Tips and tricks for preparing for Easter in preschool
I read the children Seven Eggs, by Meredith Hooper, to get us started.  In the story, one egg opens each day for a week, so as we read we predicted which day would be next, and what might hatch out of each egg.  The eggs all looked different, so the children thought different animals would hatch from each one, and they were right.  The hatchlings included reptiles and birds, but the children also predicted frogs, (okay, and hippos) so I was pleased to see they remembered many different kinds of animals that lay eggs.
Tips and tricks for preparing for Easter in preschool
After we read, I pulled out my bag of empty Easter eggs, and some treats to stuff them with.  Each year, the children's parents send in just the treats, and the children stuff the plastic eggs I've collected over many years.  I've included some of the things we put in the eggs this year, to show some of the non-candy options: necklaces, rings, jewels, bubbles, plastic animals, hair doodads, stamps... other possibilities include stickers, coins, tiny toy cars.  Please please, keep in mind the ages of the children you are catering to, and supervise closely for children that mouth small parts.

To stuff the eggs with a class full of kiddos, we sit in a circle, and I roll one or two empty eggs to each child, and then the treat(s) to put in the egg.  The children open their eggs, stuff them, and close them up again, then hold it straight up in the air for the other teacher to collect.  When they're ready for another egg, they hold their hands out in front of them, to show me they'd like another.  We train the children to do it this way so they understand that we don't want a dozen children yelling at us for help, for more, for ... well, really, for anything!  Each day from now until Easter, or until the eggs are all filled, we'll stuff a few eggs.  The children LOVE doing this, seeing the treats, and helping to prepare for our big Easter egg hunt.  Unfortunately I didn't take any photos of this in action - I was very busy handing out treats and eggs!

Some of my young artists wanted to draw and decorate eggs to follow up, so I offered a variety of stencils with ovals, hearts and star shapes to help them make their shapes.  We had a lot of egg pictures today, and the stencils will stay available in the art center for as long as the children are interested in them.

When we went outside, we took 50 empty plastic eggs and a bunch of baskets and containers with us.  The children all hid the eggs in the backyard, then came back together, counted down from ten to zero, and... ran!
Tips and tricks for preparing for Easter in preschool
They hid the eggs over and over and over again!  This game will also go on for weeks, they never get tired of it.  This will give us a lot of opportunities to think about how we can be fair to each other as we hunt eggs, to practice getting some, but not being too greedy, and to see that our youngest friends move a little slower than the biggest kiddos, and to understand why I'll let them start the real hunt before their older friends.
Tips and tricks for preparing for Easter in preschool
 Eventually the crazed rush of our first attempts calms down, and this becomes a much more peaceful less crazy experience.  The real egg hunt will still be super fun - that's when there will be surprises in our eggs - but instead of a having just a brief frenzy of egg snatching and strong emotions on a single day, this practice allows the children to satisfy their desire to do it over and again.  Isn't that what every child wants?
Tips and tricks for preparing for Easter in preschool
Happy Spring!

Friday, March 28, 2014

We really dig D!

We really dig D.  As in really, we got to dig in dirt for the letter D review day.  It was not disgusting, dangerous or delicious, just really really dirty.

 We had a second sensory table available with diggers and dumpers in corn and seeds, and the group that played at that table created a huge road block, and then destroyed it.
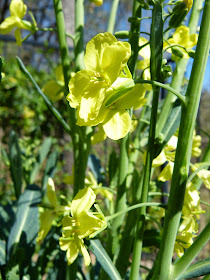
Some friends were more interested in the veggie garden, where our cabbages have gone to flower.  We tasted the flowers - they are edible - and they were deliciously sweet.  As one child said, "Not sweet like a strawberry," but still quite nice.


 We read several books - if you know me, you are not surprised! - including Changes by Marjorie N. Allen, and Bumblebee, Bumblebee, Do You Know Me? by Anne Rockwell.  Both books included daffodils, which we can see blooming in the neighborhood.  I found a fun craft about daffodils on http://www.rockabyebutterfly.com, which even included the picture to paint!  The kiddos enjoyed painting, and adding the 3D element to their pictures.  Delightful!

Wednesday, March 26, 2014

Letter C Review Day

For the letter C review, I thought we'd get a little crabby.  We read two books about hermit crabs looking for new homes, Is This a House For Hermit Crab?, by M. McDonald, and A House For Hermit Crab by Eric Carle.  As we read, the children took turns holding our crab finger puppet, and they acted out the Eric Carle version, joining in on the refrain.  We made a Venn Diagram telling how the books were similar, and how they were different.
 

To follow up, I offered a crab craft.   I found the idea for this craft at iheartcraftythings.com.  The children had to learn how to draw a spiral shape, and chose to decorate their shells with whatever was on our art shelf: markers, crayons, pompons, foam pieces, paper, etc.


I didn't take any pictures of our meals today, but C is an easy letter to find foods for!  At lunch time we had chicken, carrots, cauliflower and corn bread dressing, and at snack I served cucumbers and crackers.  At first, only a couple of children wanted any cucumber, but when I offered to pepper and salt the slices, a lot more friends tried it - and liked it.  They ended up eating every bite of two large english cucumbers!

It was cold and wet for a good portion of the day, and we couldn't get outside in the morning.  Ms. Julie organized flashlight games, searching for letters, numbers, and words around the room.  I have an alphabet posted on my ceiling, just for this purpose, and laying on the floor with flashlights is a big deal!  We LIKE flashlights!

Later in the day we did play dough with all kinds of cookie cutters - more good C review.  I got out my real cookie cutters as well as the play ones, and the kiddos worked their finger muscles as they kneaded, rolled, and shaped the dough, and cut out cookies. 


Cookie Monster is right, C IS for cookie!

Tuesday, March 25, 2014

Lids, Caps, Tops... A Free, Recycled Learning Material

Lids, caps, tops... free recycled learning materials from Paula's Preschool and Kindergarten
It isn't a new, or an original idea to use lids as manipulatives in the classroom.  I read about collecting household items to use in math instruction in Math Their Way, first published in 1976. There are a lot of innovative ways to use these free materials to teach mathematics, as well as art and environmental awareness.  Today I'd like to share some of them with you.

Sorting... we sorted by color here...
Lids, caps, tops... free recycled learning materials from Paula's Preschool and Kindergarten
 ... and by size and shape here.
Lids, caps, tops... free recycled learning materials from Paula's Preschool and Kindergarten
 It's fun to make concentric circles, which also happens to involve seriating by size.
Lids, caps, tops... free recycled learning materials from Paula's Preschool and Kindergarten
 You can build tall towers, which not only involves seriating, but also fine motor skills and balancing.
Lids, caps, tops... free recycled learning materials from Paula's Preschool and Kindergarten
 You can see several of those things happening as these children play.
Lids, caps, tops... free recycled learning materials from Paula's Preschool and Kindergarten
 We also used the larger lids to make enclosures at our pretend zoo!
Lids, caps, tops... free recycled learning materials from Paula's Preschool and Kindergarten
 What about sorting with subgroups?  Skinny yellow lids within a container of skinny lids, within a container of various lids...  I showed the children my sorting rule, and they figured out where to put each lid.
Lids, caps, tops... free recycled learning materials from Paula's Preschool and Kindergarten
 Another group made a rainbow picture, not only sorting by color, but making a picture with it.
Lids, caps, tops... free recycled learning materials from Paula's Preschool and Kindergarten
All this was on day one of this material being available!  We'll be exploring further, and hopefully will include some of the other lid ideas I've collected on this pinterest board:

In the meantime, start saving your lids! 

B Review Day

 I have to share a secret:  I love teaching the letter B.  I think it is my favorite letter.  There are so many fun things we can do for it: ride bikes, blow bubbles, bake bread... and we did a lot of them during our B week.  You can see the blogs about that here.  It should be no surprise then that we had LOTS to do today.

We had a friend with a birthday, so of course, there was baking, and blowing out candles... and eating of course!
We had lots of "b" things for lunch: beans, green beans, bagel, and a big bowl of berries and bananas.  My friends cheered when they came inside and found bagels were on the lunch menu!
While we were outside we enjoyed bathing the baby dolls in a bubble bath.  We were very busy!


Letter A Review

We've made it all the way through the alphabet, but there were so many fun activities that we didn't get to, or that we REALLY want to do again, that I like to close out the school year with a quick one day review for each letter.  

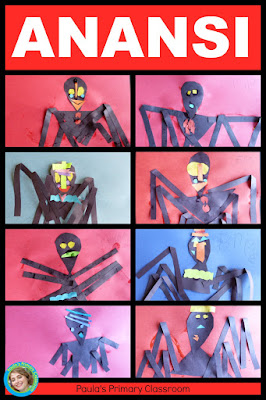
Art and fine motor development with Anansi the Spider, Paula's Primary Classroom

For the letter A we read Anansi The Spider, by Gerald McDermott, and admired the bold illustrations.  I had seen an art lesson based on the book on Artsonia.com, and wanted to try it out.  It was a lot of fun, and the children were able to really work on scissor and gluing skills, while noticing shapes and colors too.

They worked very hard to create Anansi and his sons!


In the afternoon we enjoyed applesauce and animal crackers.  Quick, easy, and just what the kiddos love.

Friday, March 21, 2014

Z is for Zebras and Zoo

 We're at the end of the alphabet, and like the other last few letters, there's not a lot that starts with Z.  Fortunately, zoo and zebra do, and we live near a great zoo, so we can include a zoo visit in our learning activities this week.

We started the week with Animal ABC's, and a sensory box full of plastic zoo animals.  After we read the book, the children dug in the sensory box for the animals, and then sorted them by initial letter.  This was a fun, sensory activity that engaged the children, and let us review our letters all at once.  After we completed this activity as a class, I made it available for free play too, and the children used it all week.


To follow up the whole class sorting lesson, the children made their zebra striped uppercase Z craft.  Teachers prepared plain white paper with lines to show where the children would need to cut, and the kiddos glued torn black paper stripes onto the other side.
 Later in the day, once the glue was dry, they cut out their letters.  Our Z's stripes were all unique, just like zebras'.
On Tuesday, we read two class-made books.  One was an alphabet book illustrated with photos of a previous class at the zoo.  (A is for aviary, B is for birds, etc.)  The children helped me brainstorm lots of zoo animals, and what letters they start with.  I wrote them all down, to prep for our field trips to the zoo, and for making a new photo alphabet book about the zoo with this year's kiddos.

We also read a copy of The Zoo Book by Heidi Butkus which we've been singing along with all week on YouTube.com.  After we read the one made by last year's class, we illustrated a new one - OUR copy.  The children love reading books that they helped to make!  

We also made our lower case z craft, once again cutting out the letter z, and adding stickers and cut paper zoo animals.
 Here are some of our completed letter crafts.

On Wednesday, I took 2 trips to the zoo.  Boy, was I tired that afternoon!  It's nicest all around to take a small group of kiddos, so I divide the kiddos into three groups of 4, take one group at a time, and leave the others at school with Ms. Julie.  Next week, I'll take the final group!  

The kiddos back at school made their z page for their individual alphabet photo albums.  This page is a bit sparse looking, as I couldn't find clip art, stamps or stickers for zucchini, zither or zig-zag, and the zero looked like a letter o, so I didn't want to use it.

To prepare for the zoo field trips, and to make sure we get a picture for each letter of the alphabet, I made a list of animals for each group to look for.  The first group went to the Museum of Living Art, and the birds, penguins and kangaroos, all located towards the middle of the zoo.  The second group went to the far end of the zoo, to Texas Wild, and the last group will go to the African Savannah and Asian Falls areas.  There isn't time to see the whole 64 acres of zoo in one trip, not with little legs that get worn out easily, so we try to see different areas on each trip.


 In case you would like to make a similar alphabet book on your trip to the zoo, here's how I divided our search.  I've included some letters in more than one area, and of course, there are many other possible choices!
MOLA and central areas of the zoo: C (cobra or crane), D (diamond back rattlesnake or ducks), F (flamingo, fish), I (iguana, insects), K (kangaroo, komodo dragon), N (newts), P (penguins, python), S (snake, scorpion), U (underground snake - the Louisianna Pine Snake), V (vulture, venemous vipers)
Texas Wild: A (alligator, ammonites-fossils in the Texas map near the entrance to Texas Wild), B (bald eagle, bobcat), J (jaguar), L (longhorn cow), M (mountain lion), O (otters), Q (quail), U (sea Urchins - touch tank in the Gulf Coast display), W (white tailed deer, wagon, wolf), X (in Texas, or in exit), Y (Yellow Rose Express train).
African and Asian animals: B (sun bears), E (elephant), G (gorilla), H (hippo), I (ibex), L (lion), M (monkeys, meerkats), O (ostrich, orangutan), R (rhino), T (tiger), W (warthog), Z (zebra).

On Thursday we read More Life Size Zoo by Teruyuki Komiva, but again, there are many choices of zoo themed books to choose from.  Here are some others I have available for the children:

We followed up with a cute craft, creating our own zoo pictures with foam stickers.  Simple, easy enough for the smallest kiddos, but still working fine-motor muscles for the preschoolers, and of course, the children had to write their name.  It's hard to see from these photos, but they wrote "My name's Zoo" in the center of their picture.

On Friday, we made our zebra hand print crafts based on this one, and zucchini muffins. We used this recipe, because I was fairly sure that having chocolate chips in the muffins would convince everyone to at least try them.  The ingredients looked yummy!
 I had 3 small zucchinis to grate, and 12 kiddos to help, so I cut each zucchini into 4 pieces.  One of the kiddos exclaimed, "Hey, that's in quarters, just like when we cut up bananas!"  I love when they remember concepts weeks after I introduce them - it means they are really learning.
 Each child got to put a piece of zucchini in the food processor to grate it.  This was their first time to use the food processor, so they were very excited!
 We all took turns adding another ingredient, and of course smelling the spices and chocolate chips.


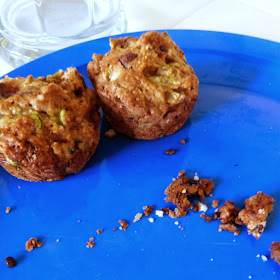
 At snack time we got to try them!  They looked so good!

I had the children predict whether they thought they would like the zucchini muffins, and to graph our predictions.  After tasting we checked to see what the actual results were - we are scientists, after all!  The final veridct?  Well, there were 48 mini muffins to start with, and here's what was left:
Only one child didn't like them, everyone else ate 2 - 5 muffins each!  We will definitely make this recipe again, and next time, I'm going to add a cup of applesauce to the mix, to moisten it a little more.  Yum!