Welcome to Paula's Primary Classroom! This blog is where I share ideas for teaching and learning with families, friends and other early childhood educators. Please don't use the photos or text of this blog without permission, but please do use any ideas you find useful. Thank you for stopping by!

Friday, October 30, 2015

Big Pumpkin

I have to share the neatest felt board that I think I've ever seen:
It's the whole crew from Erica Silverman's Big Pumpkin!  This fantastic story time prop was created by Ms. Sandra at my local library - brilliant!

This felt set would be amazing to me under any circumstances, but it's especially so since Big Pumpkin is one of my favorite Halloween books - and has been a hit with my students for about 20 years.  (It was published in 1992, and I believe I got the book and tape for it in about 1994.)  The very best part of it, to me, is the tape recording of the story.  While you may not ever find (or want!) a cassette recording of the story, you and your students can still enjoy the music by checking out the book on YouTube.


So how might you extend the story, and have some hands on fun with your children?  How about letting the children mix some red and yellow paint to make a big orange pumpkin?

I had my kiddos cut out a pumpkin shape and use black paper scraps to make their own jack-o-lanterns.

You could paint their knuckles orange, and help them make a fist print pumpkin....
We added torn tissue paper grass for our pumpkins to sit in, and when everything was dry the children drew on the faces with a black marker.

Of course, the very BEST thing to do with a big pumpkin, is just what the witch did in the story - make it into pumpkin pie!
I bet you know what to do with the pie!  Delicious!

I wrote a short poem and book about pumpkins for young readers, you can see it in my TeachersPayTeachers store.

Want even more pumpkin ideas?  I've blogged about our pumpkin adventures before, check those posts out here.

Wishing you a lovely fall, full of pumpkin pie, pumpkin muffins, pumpkin scents, and great big pumpkins!

Saturday, October 17, 2015

The Halloween Fairy

We all know about the tooth fairy, the Easter bunny, and Santa Claus, but not everyone knows about the Halloween fairy!  I was introduced to her by my oldest son's preschool teacher, Ms. Michelle, about 18 years ago.

The Halloween fairy comes late at night on October 31st, after all the candy has been collected, the costumes removed, and excited but exhausted children are in bed.  If you want her to stop at your house, you need to choose some candy to keep, and some to put out for her.  Just as the tooth fairy exchanges a lost tooth for a special treat, the Halloween fairy leaves healthy alternatives when she takes away the excess candy.  Our fairy was great about leaving us mangoes, kiwi fruit, pineapple... she knew just exactly what our favorite fruits were!  My boys weren't too impressed with the hard candies- or for that matter the non-chocolate candies - in their Halloween loot stashes, so those always went out for the fairy.  When they were very little, they chose 10 pieces of candy to keep, and put the rest out.  (We also only went to a few houses.)  Later we kept more, and eventually, just like the tooth fairy, the boys outgrew the Halloween fairy.

I should tell you right now, my sons have very different opinions about the Halloween fairy now!  At almost 20 (how can that be?!) my oldest thinks the Halloween fairy was an injustice and scam that I perpetrated upon him, albeit with good intention.  His younger brother prefers to remember the mango and pineapple, and thinks it was a pretty good deal.  They are both very healthy eaters, and prefer fresh fruits and veggies over junk (most of the time), so no matter what they think, I have to believe the Halloween fairy did her work well. 

On a cautionary note, a friend once asked me what the Halloween fairy does with the candy she collects.  The sad truth, as I told my friend, is that mostly she stores it on her thighs.  :-)  Some got shared in various ways, but... well... butt.

So how does this work?  For our family, it meant taking out the candy the kids were keeping, then putting the rest back in their sack and leaving it outside the back door, or in the garage.  I've heard she's a pretty resourceful fairy, so she'll probably cooperate with whatever set up works best for your family.  She has also been know to bring small toys, like the spider web shaped bubble blower wand she had one year.  I think her main mission is to promote healthier choices than hoarding a stash of Halloween candy and gorging on it for most of November.

Wishing you a delicious, but also healthy, Halloween!
Paula


Thursday, October 1, 2015

Trick or Treat, Smell my Feet!


Trick or Treat, Smell my Feet!  Halloween writing activity from Paula's Preschool and Kindergarten
I often talk about hands-on activities... this week we're going for a feet-on project instead!  Going through some old photos, I found this cute art and writing activity, which is super fun for a classbook or a bulletin board.
 Trick or Treat, Smell my Feet!  Halloween writing activity from Paula's Preschool and Kindergarten


Trick or Treat, Smell my Feet!  Halloween writing activity from Paula's Preschool and Kindergarten

Trick or Treat, Smell my Feet!  Halloween writing activity from Paula's Preschool and Kindergarten
We used Halloween colored paper and helped each child make a white ghosty footprint on it.  While the footprint dried, each child simply wrote one thing they'd like to eat.
 Trick or Treat, Smell my Feet!  Halloween writing activity from Paula's Preschool and Kindergarten


When everything was dry, the kiddos added ghostly details and glued it all together.
 Trick or Treat, Smell my Feet!  Halloween writing activity from Paula's Preschool and Kindergarten
Happy Halloween!

Wednesday, September 23, 2015

How to Roast a Pumpkin... and what to do with it

It is no secret that I LOVE pumpkins.  I've blogged about them many times, and cooked with them many more than that.  My students have helped me choose pumpkins at the market, taken photos with them, done art and sensory activities with them, cooked them, made muffins, pies, bread with them, grown them, roasted the seeds, learned about their life cycle, and over the last 10 years, eaten hundreds of pounds of pumpkin.  I REALLY like pumpkins!

What a surprise to realize that a lot of people don't know how easy it is to cook your own pumpkins, or how much sense it makes financially.  Today I want to show you!

Step 1: Procure pumpkin.  I got this beauty at my local Farmers' Market last Sunday.
Step 2: Cut it in half.  I learned the hard way that trying to peel a pumpkin is worse than herding cats.  Trust me, the flesh will come out much easier after it is baked!
Step 3: Remove the stringy bits and seeds.  I like to keep the seeds for roasting - they are delicious, and you are already going to have the oven going - you may as well have a yummy salty snack while you are waiting for the rest of the pumpkin to cook.  Which reminds me, turn on the oven to 350*.

Put the prepared pumpkin halves in an oven safe container that has sides - most pumpkins will release a fair amount of juice while cooking.  Here are my pumpkin seeds washed, and soaking in salted water.  You can leave them soaking for a few hours before cooking, or if you are impatient, skip the soaking.  Use spray oil on a cookie sheet so they don't stick, sprinkle them with salt, and put them in the oven.
I was really surprised that this particular batch took 30 minutes to cook through - thinner seeds may take as little as 10 minutes.  The seeds of every pumpkin are different, so you need to check on your roasting seeds every 10 minutes or so, and pull them out when you are satisfied with them.  This is the darkest I've ever roasted them (on purpose) and they were really good!
Let these cool a little, and then pop some in your mouth - you can eat them whole, even the seed coat.  If you have some left, let them cool completely and then store in a sealed container.  We didn't have any left. 

Here's the cooked pumpkin - this particular one was very dense, and cooked for 100 minutes.  I tested with a fork every 15 minutes after the first hour.  The pumpkin is done when the fork goes in easily - you want the flesh to be nice and soft.
Scrape the soft flesh right out of the skin with a spoon, and put it in a blender or food processor.  You may need to add a little of the juice that has separated from the pumpkin, depending on your processor.  If it is still hot when you do it, please be extra careful, only fill the blender/processor half way, leave a small opening for steam to escape, and lay a towel over the top of it before you blend.  You do not want to be splashed by hot pumpkin!  Pour the pureed flesh into storage containers.
I used plastic containers that lunch meat was packaged in, they're a handy dandy 2 cups size, and stack nicely to refrigerate or freeze.  I let them cool on top of ice packs on my counter until they are cool enough to go in the refrigerator.   That's all there is to it!

Your pumpkin puree will be a thinner consistency than what you get from a can of pumpkin, because you've retained all the juices.  You may need to adjust your recipes accordingly. 

This particular pumpkin cooked up to a lovely golden yellow - again, each type of pumpkin is different.  Experiment to find which variety you like best, and which ones have the nicest seeds.  I ended up with 8 cups of cooked pumpkin, as this was a medium sized pumpkin.  I've had large pumpkins yield over 25 cups before - so I freeze what I don't need immediately.  Use it within 6 months.

So why bother eating pumpkin anyway?  It seems like a lot of work, spending 2 hours in the kitchen to roast and process it, is it worth it?  I think so!  The cost per cup is much less than if you bought a can at the grocery store, and it is fresher.  You may even know the farmer that grew your pumpkin.  (I'm taking the grower some of the muffins on Sunday, and maybe getting another pumpkin.) 

Nutritionally, pumpkin is phenomenal!  According to SELFNutritionData, each cup of pumpkin has 3 grams of fiber, 2 grams of protein, 19% of your daily vitamin C needs, and 245% of your daily vitamin A!

My favorite way to eat pumpkin is in my pumpkin gingerbread muffins.  I started, long ago, with a recipe I found on-line, and have tweaked and changed it until it's truly my own recipe.  I have people beg me for these.  Warning - they are hard to resist!

Pumpkin gingerbread muffins
ingredients:
2  cups sugar                    1/4 cup vegetable oil
1/2 cup applesauce           4 eggs         
***3 cups pumpkin puree (homemade)
2 tsp ground ginger           1 tsp nutmeg
1 tsp cinnamon                  1 tsp cloves
2 cups white flour              1 1/2 cups whole wheat flour
2 tsp baking soda              1 1/2 tsp salt
1/2 tsp baking powder

***If using canned pumpkin, add 2/3 cup of water.

directions:
Preheat oven to 350 degrees  F.  Grease 2 muffin pans (recipe makes 60 mini muffin, or 30 regular).
In a large mixing bowl combine sugar, oil and eggs, beat until smooth.  Add water, pumpkin, and spices, stir.
In another bowl combine flour, baking soda, baking powder and salt.  Add dry ingredients to the pumpkin mix and combine.  Pour into muffin tins and bake until a toothpick comes out clean, about 20 minutes (12 minutes for mini muffins).
Even although this makes a huge batch, they remain incredibly moist and fresh for about 4 days - if you can resist that long.  They also freeze well. 

Happy fall everyone!


Thursday, September 17, 2015

Whoo-Whoo Loves Owls?

Owl imagery seems to be everywhere lately - from clothing to classrooms, home decor to Harry Potter movies.  Perhaps that's where it all started, but regardless, they are pretty fascinating creatures!

I've been thinking (and creating) about owls a LOT lately.  I was even lucky enough to find an owl pellet in my new backyard recently- totally cool!  I've been looking back through my photos for a couple of days, and cannot find (yet) photos of our owls crafts.  I do however have a lot of owl activities on my owls pinterest board, if you are looking for crafts.


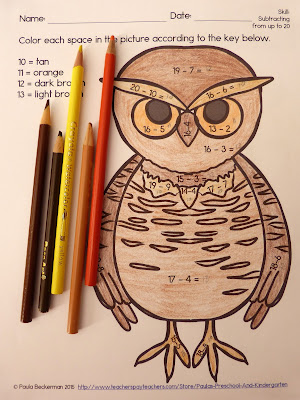
I thought I'd start with a freebie, because really, who doesn't like free things?!  This packet includes color by number owl puzzles for addition and for subtraction, and an ordering by size page too.
https://www.teacherspayteachers.com/Product/Owl-Math-Freebie-2086566
If your kids love it, I have a larger pack available too.  Here's an example of what's included:
https://www.teacherspayteachers.com/Product/Owl-Math-2086545


Have you ever worked in a school that didn't allow a Halloween theme?  Bats, owls and spiders make a nice alternative to witches and ghosts if you do!  This set has AB, ABC, AAB and ABB patterns made with bats and owls.  There are 12 pattern strips for students to extend, and for each pattern type I also included a worksheet  to continue patterns, and a make-your-own pattern page to engage higher level thinking skills.


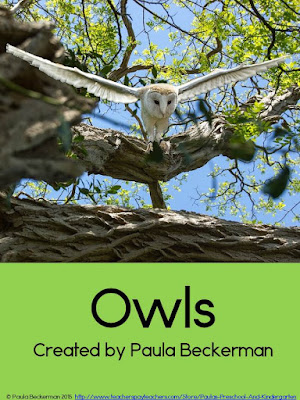
For students who are already fairly fluent readers - I aimed for 2nd to 3rd grade, but of course, there are always students whose reading level is higher or lower - I wrote a non-fiction book about owls, which includes a reading comprehension page.  I learned so many cool things about owls while I was researching this project - like that different owls nest in very different places, from trees and on buildings, to nests on the ground, and even in borrows!  I love connecting different disciplines, like science and reading!
https://www.teacherspayteachers.com/Product/Owls-2071310


Last fall I worked on some fun owl hundreds charts mystery pictures, and created two different sets: an early primary number recognition set and a set that requires students to solve addition, subtraction andmultiplication problems.


The last owl activity I have for you today is a set of 4 telling time foldergames.
This is the game for time to the half hour.  There are also games for time to the hour, to the hour and half hour, and to the quarter hour.
https://www.teacherspayteachers.com/Product/Owl-Time-4-folder-games-2044944


Don't you love owls?

I've also linked up this week with
  Teaching Blog Addict Freebie Downloads
I posted my Owls Freebie - and there are LOTS of other cool goodies.  I hope you'll go check it out!


Wednesday, September 2, 2015

Teaching children to wash their hands

Children are young scientists, true hands-on learners.  Those little hands go everywhere!


We know one of the best ways to stay healthy is to wash our hands properly, but as anyone who has ever had/seen/known/been a child knows, children don't always do it well!  As an early childhood teacher, I've heard my share of, "they look clean to me".

I think that's the problem for a lot of kiddos.  Unless they can see something on their hands that they personally consider gross, they look "clean enough".  This makes sense in a way, children are concrete thinkers and learners.  If we want them to wash off invisible germs, we have to find a way to make them concrete for the children.

Several years ago I came up with a solution - glitter paint!  I explained to my students that germs are a lot like glitter: very very small, and very, very sticky.  I put a tiny squirt of glitter paint into their hands, and have them rub it in.
Then we hug each other, pass a few toys around - do all the normal things that children do.  After a couple of minutes, we look for glitter.  It's invariably on everything we touched, and lots of things we don't even remember touching: the carpet, our clothes, the toys, our faces.  That stuff gets around!

Seeing that glitter (and by extension germs) spread really easily is a good start, but next we have to learn how to get rid of it!

I model washing my hands super fast, just a quick splash under the faucet, and then we look at my hands.  Oh dear!  Glitter (and germs!) everywhere still!  I try again with soap but not much rubbing.  Again, there's still glitter all over my hands.

At this point the kiddos can usually tell me that I need to use soap, rub it all over my hands, and rinse well.  Sometimes we count to 20 (20 seconds is the recommended handwashing time), and sometimes we sing the Happy Birthday song twice.  When we look at my hands again, there's still glitter left, but not much.  I challenge the children to see how much glitter they can wash off, and they get busy!
Check it out, this little guy is really rubbing his hands together in the water!  So what's the result?

Clean hands!  (I love how the boy in the back is really looking at his hands to see how well he did!)

I recently had 2 former parents mention that their children take forever to wash their hands, counting outloud to 20 of all things.  Their children just started third grade.  It's been at least 3 years since they did this activity with me.  I think it stuck!

Monday, August 31, 2015

International Dot Day

Do you know this book?

It's the lovely tale of Vashti, a child who doesn't think she can draw.  At her teacher's urging, she makes a mark on her paper, a simple dot.  When the teacher frames it in a swirly gold frame and displays it, Vashti begins to believe she can draw, at least a dot.

This simple tale speaks to me as a teacher - for surely, how we react to our students influences what they believe about themselves  - and also as an artist.  A very imperfect artist, but like Vashti, I can try.
Fun and easy ways to celebrate International Dot Day (September 15th) with your children

I thought I'd share some of the pictures of how my preschoolers celebrated International Dot Day last year, and encourage you to join in the fun.  We draw and do art projects all the time, so my kiddos, like most 3-5 year olds, already knew they were artists.  :-)  I decided to talk about dots, and the dot Vashti made with negative space, and of course, we got out the dot paints, aka bingo dabbers.  Everyone made several dot paintings, just enjoying the medium.

Fun and easy ways to celebrate International Dot Day (September 15th) with your children
It's important to let the children have time with new materials, so they can explore and be comfortable with it.  Until then, they're not likely to be interested in someone else's suggestions.

Fun and easy ways to celebrate International Dot Day (September 15th) with your children
Once the kiddos had explored the dabbers, I put some cardboard circles out on the table.  I placed one in the center of my blank paper, and joined in on the dabbing, mostly avoiding the cardboard circle.  You can see from the circles on the table, once we started using them, a lot of the kiddos wanted to dab only on the cardboard.  That works too!

Fun and easy ways to celebrate International Dot Day (September 15th) with your children

Fun and easy ways to celebrate International Dot Day (September 15th) with your children

Fun and easy ways to celebrate International Dot Day (September 15th) with your children
Most of the children joined in with using the cardboard circles, although not everyone wanted to do that, which, again, is fine.  They were fascinated by the negative space left when they lifted the cardboard - and several of them made the connection to the book, and Vashti's dot that wasn't a dot painting.

The children helped me choose two pictures each to display on the wall in our lunch area - enough to fill the wall.  I didn't have them make swirly gold frames like Vashti's teacher, but that would be an awesome touch!  I've seen that done here.

There's actually an International Dot Day, on September 15th-ish, and as of this writing, people in 107 countries have signed up to participate - 2,900,000 people!  There are official posters and an educator's handbook availabe on their website.  If you'd like to join in, follow this link!

I've also started collecting ideas on my pinterest board: International Dot Day

I'd love to hear your ideas, and to pin them there too - please let me know how you celebrate in the comments!