
Thursday, March 30, 2017
Wednesday, March 22, 2017

Monday, March 20, 2017
Spring is in the air #Kinderfriends bloghop

Wouldn't it be nice if there was an activity that would bring out the very best in your students? Something that would get them excited about learning, behaving better, engaged in a writing activity, and eager to revisit their learning? While we're wishing for so much, we might as well make it age appropriate, and good for their physical well-being. And free, free is always good! Let's aim for the moon!
So what free miracle activity is healthy for our bodies and minds, age appropriate, and exciting too? It's really pretty simple - the simplest actually: fresh air and nature. This spring, I hope you can find a way to take your learning outside, to observe whatever plants and animals are available to you, and to incorporate them into your teaching and learning.
Step 1: Before they can concentrate and focus, our students need a chance to run, to stretch their bodies, and let loose. Remember in the olden days, we had a thing called recess? Students took a break from sitting and focusing on adult directed activities, and ran around outside. By the time they were done they were hot, sweaty, thirsty, and ready to sit down and focus again.

Step 2: Slow down and pay attention to the things around you. Kids are inherently good at this. Junior scientists from birth, they naturally observe and investigate the world. I like to make notebooks, pencils and magnifying glasses available during our outside time, it still amazes me how often students choose to draw and write about what they see. Stop and look with them - you won't be disappointed (although disgusted and freaked out are definitely possible).


Dig for worms, watch roly pollies, and compare slugs and snails.


I know for many of you, the reality is that you have to justify this kind of learning, to have paper and pencil grade-able tasks to show that learning is happening, and that you have a limited time to cover approximately 75,103 required skills. Well, I know it's just a bandaid on a gaping wound, but I've created a free printable for your students to document what they're learning as you do hands on fun learning activities.
There are 4 pages, each with room for a drawing (or photo) of the activity, and room for students to write about the experience. You can use the same printable over and again, and collect the pages in a bradded pocket chart to make individual writing books that will show the growth in students' drawing and writing over the course of the year. Best of all, students LOVE to read their own books, or those of their friends - so they'll be motivated to both write and read about the activities you set up for them. Field trip? Write about it! Cool bug on the playground? Write about it! Lost a tooth? Got new shoes? Did that exciting thing that you just have to tell your teacher all about? Write about it!

Yes, eventually you'll have to go back inside, but you'll all be invigorated, a bit hot, sweaty and thirsty, and maybe even ready to sit down and focus again. To help you be ready for those times, I've put all of my spring resources on sale for 20% off through 3/23/17. Here are just a few of them, including one more forever freebie!


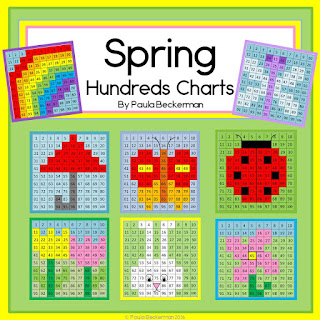
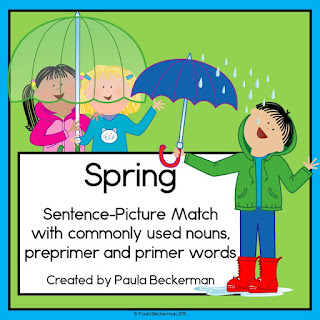
Just search #KinderFriends on TpT to find discounted resources just right for spring!
Thank you for stopping by! Now hop on over to my friend Pamela at Pocketful of Centers, to find even more spring ideas, inspiration and freebies!

Sunday, March 19, 2017

Friday, March 17, 2017
Tips and Tricks for using Mystery Pictures in Your Classroom
")
1. For our youngest learners reading the color words can be a challenge - so start out by looking at the puzzle as a group, and have the children color over the words with a matching pencil or crayon. This also ensures that they HAVE the matching color, and know where it is.
")
2. Keeping track of which spaces you've colored can be tricky, especially if there's a long list of numbers. I teach my students to color one space, then cross out the corresponding clue before going on to the next one. They can even pick up where they left off after a break, because they can see exactly which clue to tackle next.
")
")
")
")
")
")
")
")
")
")
")
Not sure where to start? How about some FREE RESOURCES?


Is there a skill or theme you'd like to see as a mystery picture? Let me know in the comments, I'm always looking for new ideas for fun learning projects!
Saturday, March 11, 2017
USA Flag Craft Tutorial

Do you know the standard dimensions for the US flag? I certainly didn't until I looked them up! This craft doesn't use exact dimensions - I've designed this with elementary teachers and students in mind - but it is close. For each flag project, you will need:

- 1 blue rectangle 4.75" x 5.5"
- 3 red strips 12" x .75"
- 4 red stips .75" x 7"
- glue
- white chalk
I've made this flag craft with 20+ first graders working at the same time, but you need to judge your students and how well they'll follow directions. Your students will need to know how to draw a five pointed star in order to put the stars on their flags. I like to read Eric Carle's Draw Me A Star to my class, and then use the tutorial in the book to teach them how to draw their own stars. His star has 8 points - but you can easily modify it for 5!
Directions:
- Lay your white rectangle on your work surface landscape style.
- Glue on one of the short red strips into the top right corner as shown below.
- Position the blue rectangle landscape style in the top left corner, but DO NOT GLUE IT.
- Use the blue rectangle as a guide, and glue another short red strip horizontally, even with the bottom of the blue rectangle.


- Get your piece of white chalk. In the center of your blue rectangle, draw a row of 6 tiny stars, spreading them across the available space.


Monday, March 6, 2017
Feeling Lucky March Giveaway
Hi friends! March is here, and it's beginning to feel a little more like spring is coming. It was so chilly out this morning - but the cherry trees are in bloom, and the garden is exploding with green, so spring isn't too far off! To celebrate the new month and all it brings, I'm participating in a $75 TeachersPayTeachers giftcard giveaway! Who's feeling lucky - someone has to win!

GIVEAWAY DETAILS
a Rafflecopter giveaway

GIVEAWAY DETAILS
Prize: $75 Teachers pay Teachers Gift Card
Giveaway organized by: Kelly Malloy (An Apple for the Teacher),
Co-hosts: Kelly Malloy (An Apple for the Teacher), Teach with Hope, Amanda's Little Learners, Reading and Writing Redhead, The Literacy Garden, Teaching Biilfizzcend, Miss Pentagirl Kinderpuzzle, Heart 2 Heart Teaching, Mrs Hansens Helpfuls, A Place of Story, Kathryn Watts, A Plus Kids, Planet Happy Smiles, Ms. K, It's a Teacher Thing, Teachers Caravan, The Chocolate Teacher, Samson's Shoppe, The Corriganite Nation, Teacher Gameroom, Peas In A Pod, Patricia Hudak, Mickey's Place, Paula's Preschool and Kindergarten, MM Bilingual, Little Smarticle Particles, and Jackie Crews.
Rules: Use the Rafflecopter form to enter. Giveaway ends 3/13/17 and is open worldwide.
Are you a blogger who wants to participate in giveaways like these to grow your blog? Click here to find out how you can join a totally awesome group of bloggers!
a Rafflecopter giveaway
Saturday, March 4, 2017
Texas Flag Craft Tutorial

Texas public schools week is fast approaching - and if you're a Texas teacher that probably means it's time to learn some state history, and to get your classroom ready for open house. It's spring, and time seems to slip away quickly, between testing, field days, assemblies, and planning end of year activities (Yikes! Already?). You need some quick, easy, and amazing looking activities that can double as open house displays!
Here's one super simple, absolutely adorable activity that your students can probably even complete on their own during centers or for morning work!
To make this Texas flag craft, you'll need the following materials for each student:

- 1 piece of white 9" x 12" construction paper
- 1 blue 4" x 9" rectangle
- 1 red 8" x 4.5" rectangle
- 1 white five pointed star (die cut, or print these and have each student cut one out)
- glue stick
Step by step directions:
- Lay your white paper landscape style on your work surface.
- Glue on the red rectangle landscape style in the lower right hand corner of the white paper.
- Glue on the blue rectangle portrait style along the left side of your paper.
- Center the white star on the blue rectangle, and glue to the flag.
- Ta-da!
These look beautiful on a wall, or hanging from the ceiling above student desks (paper clip 2 flags back to back so there is always a front side facing out). If you make a blue bonnet craft like this one, mix the flags and blue bonnets in a display.
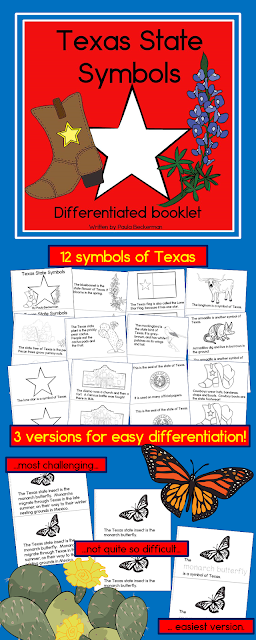
If you're looking for some Texas learning that's ready to print and go, I have some fun Texas resources in my TeachersPayTeachers store,
including my most recent addition:
Next time I'll share a tutorial on making a US flag!
Subscribe to:
Posts (Atom)