We've all seen USA flags made by elementary age children, and while they're almost always cute, sometimes they really don't resemble the flag at all. If you're looking to make an adorable flag craft, and you'd like to teach your students about the flag at the same time, you've come to the right place!
Do you know the standard dimensions for the US flag? I certainly didn't until I looked them up! This craft doesn't use exact dimensions - I've designed this with elementary teachers and students in mind - but it is close. For each flag project, you will need:
- 1 sheet of white construction paper 9" x 12"
- 1 blue rectangle 4.75" x 5.5"
- 3 red strips 12" x .75"
- 4 red stips .75" x 7"
- glue
- white chalk
I've made this flag craft with 20+ first graders working at the same time, but you need to judge your students and how well they'll follow directions. Your students will need to know how to draw a five pointed star in order to put the stars on their flags. I like to read Eric Carle's Draw Me A Star to my class, and then use the tutorial in the book to teach them how to draw their own stars. His star has 8 points - but you can easily modify it for 5!
Directions:
- Lay your white rectangle on your work surface landscape style.
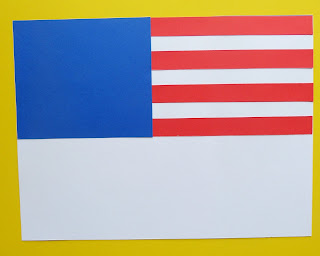
- Glue on one of the short red strips into the top right corner as shown below.
- Position the blue rectangle landscape style in the top left corner, but DO NOT GLUE IT.
- Use the blue rectangle as a guide, and glue another short red strip horizontally, even with the bottom of the blue rectangle.
- Place the last 2 short red strips between the ones you've glued down, and spread them evenly into the gap. When you have them positioned correctly, glue them down.
- Now you can glue on the blue rectangle!
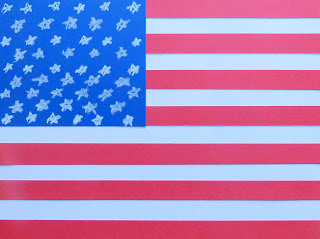
- Next you'll glue on one long red strip along the bottom of your flag. Evenly space the remaining 2 red strips in the resulting gap. When you are satisfied with their spacing, glue them down. You now have 13 red and white stripes, which represent the original 13 colonies.
There are 50 stars on the flag, representing 50 states. It's hard to just draw and count that many stars, unless you break it down into simple steps. If you look carefully at a US flag, you'll see there are 5 rows with 6 stars each, alternating with 4 rows with 5 stars each. We'll draw the rows of 6 first.
- Get your piece of white chalk. In the center of your blue rectangle, draw a row of 6 tiny stars, spreading them across the available space.
- Next draw another row at the very top of the blue background, and one at the very bottom of the blue background. Add in another row in the center top portion, and the center bottom portion. You now have 5 rows of 6 stars - 30 stars so far.
- Now we need to make 4 rows with 5 stars each. These will be centered between the other stars. I like to imagine four stars as the corners of a square, and then add one more star in the center of each square - a lot like the numbers 4 and 5 on a dice. Add all those stars in, and you'll have 50 in all!
-Ta-da! Great job! You've made a flag with 13 stripes and 50 stars. To learn more about the US flag, check out http://www.ushistory.org/betsy/faq.htm


No comments:
Post a Comment