Welcome to Paula's Primary Classroom! This blog is where I share ideas for teaching and learning with families, friends and other early childhood educators. Please don't use the photos or text of this blog without permission, but please do use any ideas you find useful. Thank you for stopping by!

Wednesday, February 3, 2016

Polar learning fun

This week at the library we read and learned about polar animals.  We talked about how some arctic animals change from brown fur to white fur in the winter - for camouflage.  We learned that polar bears have black skin and that the hairs in their fur are hollow to help keep them warm on land.  We learned that they have a layer of blubber to keep them warm in the water.  We even pretended to be daddy emperor penguins with eggs and then chicks on our feet! (Check out the cute chicks we all got to use - no, they're not penguin chicks for real, but we sure had fun pretending to waddle with one balanced on our feet.)

After all our singing and dancing and reading was done, we had some awesome follow up activities to learn from play with!

You may have seen the "blubber" glove experiment: the one where a child puts their hand inside a rubber glove that has been covered with a layer of lard to insulate it.  They put their gloved hand in ice water, and the blubber glove stops them from feeling the cold, much as many polar animals have a thick layer of fat to insulate them.  We have big groups come to story time, 45-50 children, so we needed a quick and easy (and not too messy) way to do this activity.  Here's the solution:
I put one zippered plastic baggy inside of another, then spooned in a thick layer of lard between the baggies.  I taped the bags together, so little hands wouldn't end up in the lard (ew!).  The result was a clean, dry plastic bag nested inside a bag of lard, and it worked beautifully!
The children were fascinated, many of them coming back to this experience over and again, amazed that they couldn't feel the ice water.  Of course, there were also friends who wanted to stick their hands in the ice water and just enjoy that sensation - and that's okay too.

Another fun activity we offered this week was ice painting.  Ms. Kathleen made frozen paintsicles (yes, I can too make up words) and the children ran them over their papers to create beautiful masterpieces.  I noticed that a lot of the children looked off into space as they rubbed the paintsicles around, apparently enjoying the movement and the smooth feeling of the frozen paint gliding over their papers.  This little guy painted two handed!
... and some of our friends painted their two hands!

Watching this, we know that it's important for us to continue to provide sensory play experiences!

We also had out some shallow trays of water, which were mostly frozen.  Some of the children enjoyed the sensory experience of the ice and ice water, while others used them as we had envisioned, by propping one end, and seeing which objects would slide down the ice.  The children are constantly showing us that there are indeed many "right" ways to do things in this world!

Sunday, January 24, 2016

Snowy learning at the library

One of the highlights of my week is the time spent at my local library, helping out with story times.  The Thursday sessions are especially popular - not only do we sing and dance and read books, but there are also fun follow up activities.  This week our theme was snow.

I know there are a lot of people and places that have waaaaaay more snow than they want right now, but here in northern California there isn't any.  Not to worry!  Ms. Kathleen made us up a batch of instant snow.  (No, I'm not affiliated with or compensated for linking to fun things, and yes, you can find it other places too.  This is just to make it easier for you if you are interested.)
We put all the polar animals we could gather into the large sensory bins full of "snow".
 

Here are some little fingers at work, enjoying the sensory experience of the cool wet stuff!


We sang a snowman song as part of our story time, and the kiddos used this open ended art center to create snowmen of their own.  There's paint, paper, scissors, stickers of eye balls, and someone reminded us part way through to add some glue too.  (Oops!)
You can tell this was an open ended project by looking at the resulting creations.  Yes, there were some finger painted snowmen, and some made of paper circles.  There were also kiddos who were fascinated by the feeling of paint in their hands and simply rubbed it around, and others who created... um... creations!  Our focus was on the process rather than any particular product, and the children showed us many ways to work with these fun materials.

Our third activity was making snowflakes.  We had looked at lots of snow flake pictures, and had counted six arms on them, and most of the children made snowflakes that matched that pattern.   We provided lots of pipe cleaners, shallow trays of school glue, and shallow trays of plastic "snow" shreds.  This was a sticky activity!  After bending their pipe cleaners, the kiddos dipped them into the glue, and then into the sparkly plastic shreds.  They were so pleased with themselves!

Next time we're going to learn more about polar animals - I can hardly wait!

Wednesday, January 13, 2016

Kente Colors, art and math learning


See how I teach complex patterns with the beautiful book, Kente Colors
Have you met the beautiful book, Kente Colors, by Debbi Chocolate?

See how I teach complex patterns with the beautiful book, Kente Colors

 The illustrations by John Ward are a gorgeous accompaniment to the rhyming text about the meaning of different colors in the West African cloth.  There is even an author's note explaining a little bit of the history of Kente, which is just right for young listeners.

Years ago, when I taught first grade, I used this book as the starting point for a combined math and art lesson - which I thought I'd share with you today.

We started by reading the book and the author's note, and it is also very easy now to use YouTube.com to show students video of traditional Ghanian artists creating kente.  I like this link and this link.  We also reread the book, noticing the designs in the kente, which are inorganic, geometric shapes, in complex patterns.  Do you see the math lesson hidden in this gem?

See how I teach complex patterns with the beautiful book, Kente Colors

Next the children chose paper in several colors, each of which has a special meaning.  I found a table showing the meaning of each color here.  I cut my paper into 4" wide strips - because traditional kente is woven in long strips 4 inches wide, then sewn together into pieces of cloth.  Making narrow strips also makes it easier for students to repeat the patterns, it seems to be a more manageable size.  You can see on the photo above that I've drawn a zigzag line on one of the strips, and have several colors that I'll cut all at once.  I also made 4 or 6 of each element, so I could create a repeating pattern on two strips of paper.
See how I teach complex patterns with the beautiful book, Kente Colors
It can be difficult for young kiddos to make multiple pieces the same - so here's my trick.  I have the students fold the paper, and I staple the end together, as you can see above.  They can then draw one shape on the piece of paper, cut through all the layers without the papers slipping around, and end up with 4 copies of their shape.  If you need a little more detail, I wrote a blog post explaining this step by step.

See how I teach complex patterns with the beautiful book, Kente Colors
Here I've cut out multiple pieces so I can layer them for my pattern.

See how I teach complex patterns with the beautiful book, Kente Colors
Have your students lay the pieces out on their strips of background paper - they can move them around until they are happy with the design, and then glue them down.  (You might want to keep the glue back until students show you that they've created a repeating pattern, so they don't glue down something that isn't a pattern.)

See how I teach complex patterns with the beautiful book, Kente Colors
If  you like, you can have students make another set of kente inspired pattern strips, and then alternate them with the first pattern - creating an even more complex pattern of patterns!

See how I teach complex patterns with the beautiful book, Kente Colors

This artwork makes a fantastic display, and an excellent opportunity to discuss shapes and patterns, with an art history lesson too.  My students enjoyed this project - I hope yours do too!


Saturday, January 2, 2016

Sleepy Bears


I've been pulling down books for January - you know, all the fun polar animal books, snowmen stories, books about hibernation... winter themes!  As I gathered my books, I noticed I have a LOT of books about sleepy bears.


Here are a few favorites:


Image result for sleepy bears book

I LOVE this one by Mem Fox!  Mother bear prepares her six little cubs for bed, telling each one their own bedtime story, custom made for them.  This is a sweet story that young children will adore, and will surely relate to at least one of the cubs (princess, explorer, acrobat, dessert lover, pirate and baby).  There is a very satisfying surprise at the end, and your little ones will be calm and ready for sleep by the end of it.

When I read Sleepy Bears, I am reminded of something Mem Fox wrote in Reading Magic, a book she wrote for adults, about reading to and with children:

     "We can achieve great things emotionally if the last line is a definite dismissal, a
     farewell.  As we say it, we're releasing our listeners from their contact with us.
     Without this drawn-out final line, our listeners will feel an uncomfortable sort of
     incompleteness.  A rapid finish feels oddly wrong.  A slow finish is an absolutely
     delicious experience.  Both teller and listeners find themselves in a state of bliss,
     akin to "living happily ever after."
                                                                                                          (Chapter 6, Reading Magic)


Good Night, Baby Bear

You probably know Frank Asch from the classic Happy Birthday, Moon.  His books are just right for the preschool crowd, very sweet and loving, and this is no exception.  When mother bear tells baby bear it is time to hibernate in a cave, he has a difficult time with the change to his sleep routine - and if you have young children, you can relate!  Mother bear is patient and loving, and solves the problems that are preventing her little one from sleeping.

Time to Sleep

I've mentioned Denise Fleming's books before, and I'm sure I will again!  Once again she has paired exquisite illustrations with text that is almost poetic, and created a perfect children's book.  Bear - and the other animals in the story - notice various signs that winter is approaching, and that it is time for them to hibernate.  There is a lot of science woven into this lovely piece of fiction, and you could use it to teach children about seasons, hibernation, or woodland animals.  I used to use this one when we learned about the letter L, because there is a ladybug in the story who settles under a log to rest.  We made a letter L craft that went beautifully with the concept.  Here's a picture:


Surely you've met the Bear books by Karma Wilson?  There are several books in the series, each of them as much fun as the next.  We recently enjoyed the Christmas version, Bear Stays Up For Christmas, at our library story time.  The children loved the story and illustrations!


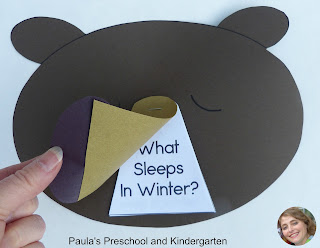
With all these sleeping bear stories, I was inspired to make a cute sleepy bear craft too.  (There's a mini book about animals that sleep in winter, hidden under his nose!)
https://www.teacherspayteachers.com/Product/Sleepy-Bear-book-craft-50-off-for-the-first-24-hours-2276061

https://www.teacherspayteachers.com/Product/Sleepy-Bear-book-craft-50-off-for-the-first-24-hours-2276061


Next time I'm going to show you some of my favorite polar bear books!  I'd love to hear about the stories your students love to hear too - please let me know in the comments!


***I do not use affiliate links, and am not reimbursed in any way for providing links.  I've chosen to link these products in order to make it easier for you to find them, if you wish.  There are many, many retailers that will be happy to help you locate these books, the links are merely suggestions.***

Tuesday, December 29, 2015

Cutting shapes for crafts - making it simple

If you work with small children, you probably spend a good amount of time working on crafts with them.  Somehow, all those craft projects seem to need an abundance of cutting!  Sure, the children can do a lot of it, especially if there's a printable pattern they can work from, but what about the other times?  Dark colored paper, and especially black paper, are hard to work with!  What to do?
Two simple and easy ways to cut out multiple shapes for craft projects!

Here are two tricks that work for me.  I hope they help you and your small ones keep sane and keep crafting!


The first trick is tracing the shapes onto black paper, using a regular pencil.  If you work in good light, the pencil lines show up beautifully - so you can hand those scissors and paper to the children and let them work on their fine motor skills as they do the cutting.  Isn't that a big part of why we do crafts in the first place?
Two simple and easy ways to cut out multiple shapes for craft projects!

Another trick that works well, and requires even less work from you, is using a printed paper to guide the children's cutting.  I think we've all tried holding a stack of papers and cutting them all at once, and unless you have an incredible grip, the papers all end up turning just a little bit... and the shapes end up skewed.  Here's the solution: staples.

Yes, simply staple the pattern on top of the papers you need to cut out.  The trick is to make sure you staple around the outside of the pattern you want, preferably in several places.  Here I stapled the corners of my white pattern on top of black construction paper, so I could make a black penguin shape for this Penguin rookery craft.  Sure, we could have colored it black, but that wasn't the look I wanted on this project, and practicing scissor skills is so important.
Two simple and easy ways to cut out multiple shapes for craft projects!
Now it's easy to cut both pieces of paper, and they aren't going anywhere.
Two simple and easy ways to cut out multiple shapes for craft projects!
Make sure you end close to a stapled area, to keep your papers together until the last possible moment.
Two simple and easy ways to cut out multiple shapes for craft projects!
Ta-da!
Two simple and easy ways to cut out multiple shapes for craft projects!
Not only do you have the desired piece cut from construction paper, but there's also a lovely white pattern piece.  I'm seeing another art project here, with positive and negative images.... but that's for another day!

Do you have any teacher tricks or life-hacks you'd like to share?  I'd love to hear them!

Tuesday, December 22, 2015

How I store my teaching resources

Someone recently asked me how I store all the teaching resources I've been creating on TeachersPayTeachers.  What a great question!  I'm sure there are a lot of "right" answers, but here's what I've been doing:

https://www.teacherspayteachers.com/Product/P-is-for-Penguin-50-off-for-the-first-24-hours-2268530
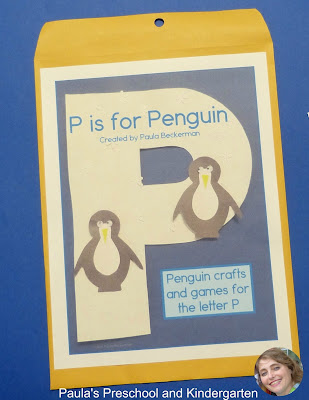
 I print out the resource, and glue the cover page onto a standard 9" x 12" envelope.  I glue the instruction page to the back of the envelope so it's super easy to find.
https://www.teacherspayteachers.com/Product/P-is-for-Penguin-50-off-for-the-first-24-hours-2268530
You can put the whole envelope through the laminator if you want to, but I have some that were made 17 years ago and not laminated, and they have survived, albeit imperfectly.  :-)

I like to use small zippered baggies to store small pieces, as rubber bands become brittle over time and sometimes end up breaking.  All the worksheets, pages, and even laminated games can slip right into the envelope!  Extra copies that didn't get used? Put them in and they'll be ready for next year!  Examples? In they go!  Small craft supplies you need for the project?  You guessed it, they slide right on in.

I like using envelopes like this because they take up so little space.  You can slip them onto a bookshelf alongside the books you teach at the same time, tuck them into the pockets of your binders, pop them in your filing cabinet - however you organize and store your materials!

Do you have a storage suggestion or solution you'd like to share?  I'd love to hear what you do - please leave me a comment!

Sunday, December 6, 2015

Holiday sensory bins

I've shared pictures of my kiddos enjoying sensory bins before - 53 times it seems!  It's something that I obviously love, to have written about it and provided these experiences so many times.  This week I had the pleasure of watching kiddos explore holiday sensory bins at our local library story time.  They were fascinated!  Here are four awesome sensory experiences - maybe your children would enjoy them too!
Holiday sensory bin ideas from Paula's Preschool and Kindergarten

Tinsel, magnet wands, and jingle bells.  So simple, and yet...
Holiday sensory bin ideas from Paula's Preschool and Kindergarten

Holiday sensory bin ideas from Paula's Preschool and Kindergarten

"Magic Snow"  comes as a powder, but when you add water it swells up and feels like cool wet snow.  Here's one link to it - I don't use affiliate links, I'm just sharing this to help you find it if your child would enjoy it!  My older son had some many years ago, and LOVED it.  The library hid finger puppets in it for the children to find, but I saw just as many children scooping up hand fulls and arm fulls.
Holiday sensory bin ideas from Paula's Preschool and Kindergarten

Pine cones and wood shavings.  These have the added benefit of smelling lovely!  These are two very different textures, contrasting nicely.  There were also magnifying glasses in here, which the children used as scoops.
Holiday sensory bin ideas from Paula's Preschool and Kindergarten

The final bin was of fake decorative snow, little bits of shiny plastic, intended as a holiday decoration.  I watched one child in particular pick up hand fulls, then  stand up and slowly release it back into the bin, so it really looked like a blizzard coming from her hands.  The fine motor workout as she rubbed her fingers to drop the pieces was impressive, but to her it was obviously just pure joyful play.
Holiday sensory bin ideas from Paula's Preschool and Kindergarten

Yes, it got messy - we had 78 children attend story time this week!  Before putting out the sensory bins we laid down large table cloths, and that did help with clean up.  If the mess worries you, there are many other mediums for sensory bins that clean up quickly: pompoms, nuts in the shell, acorns, popsicle sticks, etc.  You can also take sensory play outside, so there's not a mess in the house.  Two of my favorite outside sensory bin fillers are bird seed and seed corn - any that is dropped becomes bird and squirrel food, and we often have the opportunity to observe them up close as they clean up our messes!

Now, inspired by these fun bins put together by the library staff for our lucky kiddos, I'm thinking about what sensory bins we could make for other holidays.  Dreidels and candles, blue and silver tinsel strips for Hanukkah?  Dried corn or beans with red, green and black candles, a unity cup, and small gift boxes for Kwanzaa?  The possibilities are endless!