With Earth Day fast approaching, and spring drawing us outdoors, this seems the perfect time to celebrate the natural world around us. Here are a few of my favorite ways to celebrate all that nature has to offer.
1. Stomp in puddles.
2. No puddles? Play with ice. Or mud.
3. Collect leaves and sort them by size, shape, color, or...?
4. Collect natural materials outside, and use them to make mandalas.
5. Sort natural items into things that are seeds, and things that are not. You might find some surprises!
6. Create temporary art.
7. Make a tic tac toe board with sticks, and use rocks & leaves as playing pieces. Find sticks that look like letters.
8. Lay in the grass and look at clouds.
9. Look closely at the world around you. Take a magnifying glass and a notebook, and see what you can observe about the critters and world around you.
10. Play in the dirt. Plant things. Watch them grow.
11. Take your inside learning outdoors. Read books under a tree, practice patterns on the playground (up/down, left/right),
count everything,
look for shapes,
play I Spy, write your spelling words in chalk, or paint them with water on the sidewalk, practice numbers with hopscotch.
Most importantly, think outside the box that is your classroom, put your neck out, and explore.
Wishing you a glorious time outside!
xo Paula
I love teaching and learning with young children, this is where I share my ideas.
Welcome to Paula's Primary Classroom! This blog is where I share ideas for teaching and learning with families, friends and other early childhood educators. Please don't use the photos or text of this blog without permission, but please do use any ideas you find useful. Thank you for stopping by!
Showing posts with label natural materials. Show all posts
Sunday, April 15, 2018
Saturday, October 22, 2016
Teaching Math on a Budget
Okay, right off the bat, I know we're pretty much all on a budget - who isn't?! If you are teaching young children, chances are good that you supply a lot of the materials you use in your classroom, and it can really add up! Today I thought I'd share a few ideas that I've used to make my own teaching resources for little or no money!
Large graphs for children to work on:
Materials required: a large piece of cardboard, approximately the size of poster board, a yard stick and a marker. (You absolutely could buy poster board, or if you shop at a warehouse store, try asking if you can have some of the huge pieces of cardboard they use on pallets of cereal to separate the layers.)
Time to make it: 10 minutes tops
What to do: I measured and marked 1.5" intervals along each edge of the cardboard, then used the yardstick to draw lines between the marks. I wrote numbers on one axis, and ta-da! One large graph.
Venn Diagrams:
Materials required: a large piece of cardboard, a large bowl or plate to trace around and a marker.
Time to make it: less than 5 minutes
What to do: Turn your bowl or plate face down, off center on your cardboard. Trace the rim with the marker. Move the plate over to the other side of your cardboard, leaving a large area of overlap from the first circle. Trace it again.
Sorting trays:
Materials required: a divided tray, I got this one from a dollar store. I've also used trays from fruit/vegetable/cookie platters, and those are free - you just have to remember to either save them yourself, or to ask your families to donate them if they use them.
What to do: nothing more!
Prep time: This depends on how long you browse at the dollar store! ;-)
What about manipulatives: the small parts the children are working with. We all know that those plastic dinosaurs and bugs aren't cheap. What can you do?
Save those lids, corks, bread ties, etc. I keep a container in a cupboard in my kitchen, and every time there's a bread tie or a cork, I toss it directly in there. Lids from food containers I put in the cutlery holder of my dishwasher first, and save them when they're clean. You may also find some awesome lids in the bathroom or laundry room, just save them instead of tossing them out.
Look in your junk drawer. Okay, maybe you're perfect, and you don't have a junk drawer, but I'm guessing that somewhere in your home there's a catch-all spot full of amazing little things. Parts to that one toy your kids had a few years ago, party favors they never even played with, assorted blocks, plastic bits and bobs, rings, craft supplies, tokens from that game place you never go to anymore... Just be sure to consider the children who will be using these manipulatives, do you need to think about possible choking hazards? Sharp edges? Be selective about what will work for your students.
You may also have (or know someone who has) a tin of buttons, or beads, or maybe an avid crafter with a lot of left over odds and ends. Maybe there's a box in the garage with odd nuts and bolts, or old keys, or... go look! Once you start thinking about and noticing things that are often considered throw aways, you'll find resources all over the place!
So how can you store all this stuff? Plastic storage containers can be quite expensive, especially if you have a whole bunch of these collections going on! Check your pantry and your recycling bin! This is the container I keep in my kitchen to store those lids and corks - it originally had cashews in it, but when the food was eaten, the container got a new life, storing manipulatives. Many foods come in resealable and reusable containers, everything from lunch meats to rice, fresh salad greens to soup. If there's something in a useful container that your family uses regularly, you can save them and even end up with a matching set!
Still not sure you can find a nice variety of things for your kiddos to sort? Go outside! Here are some leaves that are in my yard right now. I see different colors, sizes and shapes. How else are they the same? How else are they different?
Okay, so maybe you don't have time to go outside and collect leaves and things for your children to use. Not to worry, put the kids to work! Here I've used a strawberry punnet as a collecting box for acorns. You can see we found some in different sizes, shapes and colors. There are acorns with holes, broken ones, whole acorns, acorns with and without caps, some that are still connected to each other, and some that aren't... there are so many ways we could sort, graph or put these on a Venn Diagram!
I hope you can use some of these ideas in your classroom! If you have another tip for teaching math on a budget, I'd love to hear it!
Large graphs for children to work on:
Materials required: a large piece of cardboard, approximately the size of poster board, a yard stick and a marker. (You absolutely could buy poster board, or if you shop at a warehouse store, try asking if you can have some of the huge pieces of cardboard they use on pallets of cereal to separate the layers.)
Time to make it: 10 minutes tops
What to do: I measured and marked 1.5" intervals along each edge of the cardboard, then used the yardstick to draw lines between the marks. I wrote numbers on one axis, and ta-da! One large graph.
Venn Diagrams:
Materials required: a large piece of cardboard, a large bowl or plate to trace around and a marker.
Time to make it: less than 5 minutes
What to do: Turn your bowl or plate face down, off center on your cardboard. Trace the rim with the marker. Move the plate over to the other side of your cardboard, leaving a large area of overlap from the first circle. Trace it again.
Sorting trays:
Materials required: a divided tray, I got this one from a dollar store. I've also used trays from fruit/vegetable/cookie platters, and those are free - you just have to remember to either save them yourself, or to ask your families to donate them if they use them.
What to do: nothing more!
Prep time: This depends on how long you browse at the dollar store! ;-)
What about manipulatives: the small parts the children are working with. We all know that those plastic dinosaurs and bugs aren't cheap. What can you do?
Save those lids, corks, bread ties, etc. I keep a container in a cupboard in my kitchen, and every time there's a bread tie or a cork, I toss it directly in there. Lids from food containers I put in the cutlery holder of my dishwasher first, and save them when they're clean. You may also find some awesome lids in the bathroom or laundry room, just save them instead of tossing them out.
Look in your junk drawer. Okay, maybe you're perfect, and you don't have a junk drawer, but I'm guessing that somewhere in your home there's a catch-all spot full of amazing little things. Parts to that one toy your kids had a few years ago, party favors they never even played with, assorted blocks, plastic bits and bobs, rings, craft supplies, tokens from that game place you never go to anymore... Just be sure to consider the children who will be using these manipulatives, do you need to think about possible choking hazards? Sharp edges? Be selective about what will work for your students.
You may also have (or know someone who has) a tin of buttons, or beads, or maybe an avid crafter with a lot of left over odds and ends. Maybe there's a box in the garage with odd nuts and bolts, or old keys, or... go look! Once you start thinking about and noticing things that are often considered throw aways, you'll find resources all over the place!
So how can you store all this stuff? Plastic storage containers can be quite expensive, especially if you have a whole bunch of these collections going on! Check your pantry and your recycling bin! This is the container I keep in my kitchen to store those lids and corks - it originally had cashews in it, but when the food was eaten, the container got a new life, storing manipulatives. Many foods come in resealable and reusable containers, everything from lunch meats to rice, fresh salad greens to soup. If there's something in a useful container that your family uses regularly, you can save them and even end up with a matching set!
Still not sure you can find a nice variety of things for your kiddos to sort? Go outside! Here are some leaves that are in my yard right now. I see different colors, sizes and shapes. How else are they the same? How else are they different?
Okay, so maybe you don't have time to go outside and collect leaves and things for your children to use. Not to worry, put the kids to work! Here I've used a strawberry punnet as a collecting box for acorns. You can see we found some in different sizes, shapes and colors. There are acorns with holes, broken ones, whole acorns, acorns with and without caps, some that are still connected to each other, and some that aren't... there are so many ways we could sort, graph or put these on a Venn Diagram!
I hope you can use some of these ideas in your classroom! If you have another tip for teaching math on a budget, I'd love to hear it!
Saturday, April 23, 2016
Celebrating Earth Day with Natural Materials - part 2
I wrote last week about some ways to celebrate Earth Day with natural materials - and this week we implemented those ideas at our library story time. Here are the results!
We (50 children and their caregivers!) took a walk around the library, collecting natural treasures as we went. In our plants themed learning earlier this month we learned that plants breathe through their leaves, so we didn't want to pick any living leaves or flowers off our plants. The children were incredibly respectful, choosing fallen leaves, petals, sticks, seed pods, bark and more, but leaving all the living and growing things outside where they belong.
It was an absolutely beautiful day for a nature walk!
Back inside, we provided blank pages for the children to arrange their treasures, but instead of giving them glue or another way to stick everything together permanently, we made our creations temporary works - and encouraged our families to teach their children how to use camera phones to capture their pictures!
There was a lot of counting and lining up of materials, as well as some beautiful arrangements!
Here a grandmother is teaching her little one how to use the camera phone, and to email it to mom and dad at work! This is age appropriate use of technology, a way to use it to connect children and families. I LOVE IT!
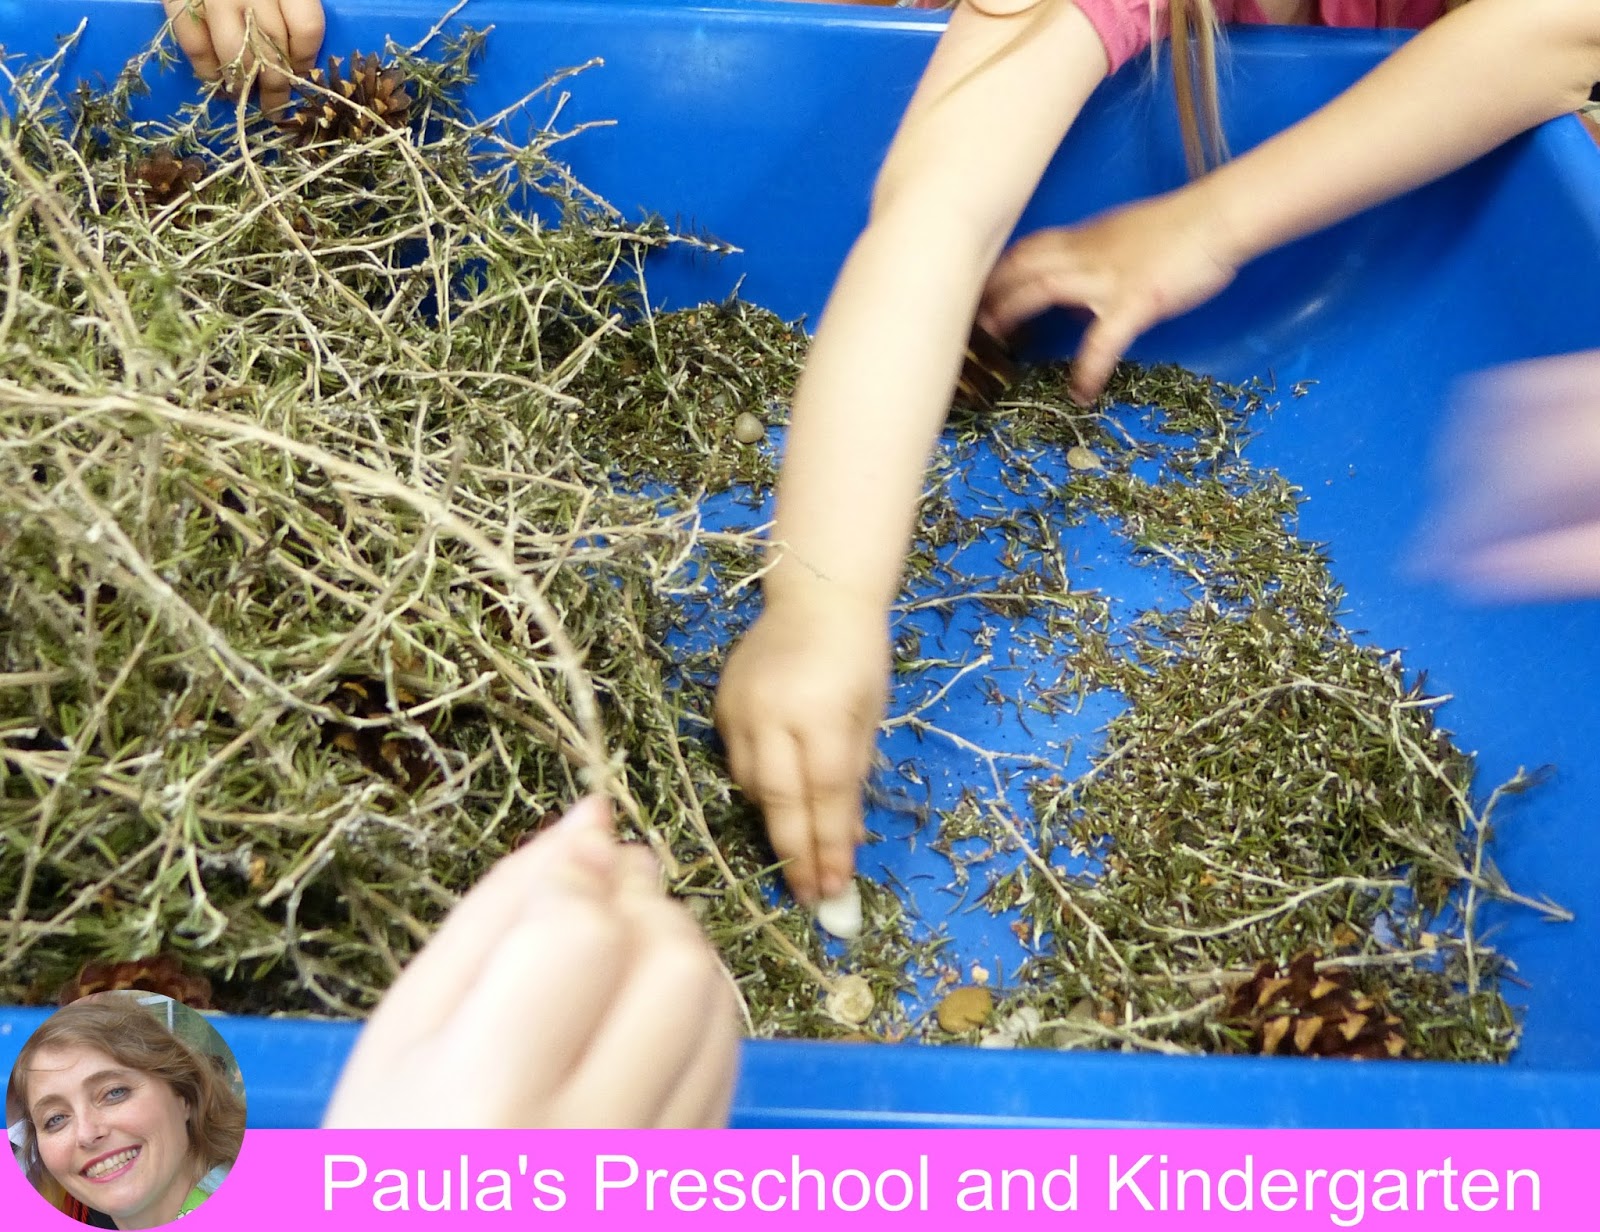
We also put out a lovely natural sensory bin for our little ones to explore. I recently trimmed my rosemary bushes, and saved the fragrant leaves to use as a base for our bin. We added pretty pebbles, pine cones and shells. As the children searched through the bin, the rosemary leaves separated from their stems and released a beautiful scent. This was a sensory bin in more ways than one!
Small children seem to love collecting tiny things, and this group was no exception. They carefully collected every pebble, shell and pine cone from the rosemary, then sorted and explored them. (The long conical shells at the top of this picture turn out to be "unicorn horn shells". Who would have known?)
Seeing the kiddos sorting, we grabbed out some trays and had them work together to separate all the materials - wonderful for us, because we were planning to sort it all out to put it away when the children were done.
There was one more fantastic learning opportunity today, but I'm not a skilled enough photographer to capture it well: we introduced the children to maple seeds. If there was a maple tree anywhere in your neighborhood as a child, you may remember them as "helicopter seeds" - when tossed in the air they spiral down like little helicopters. I had collected hundreds of them while walking this last week, and the children were, of course, fascinated. There were 8 - 10 children at a time on the carpet throwing seeds up in the air, and laughing and jumping as they watched them spiral down.
Natural materials like these are free, just laying around at our feet, waiting for us to remember the wonder of being a child scientist, to joyfully explore and discover.
May all our days be filled with helicopter seeds, unicorn horn shells, and the laughter of children!
We (50 children and their caregivers!) took a walk around the library, collecting natural treasures as we went. In our plants themed learning earlier this month we learned that plants breathe through their leaves, so we didn't want to pick any living leaves or flowers off our plants. The children were incredibly respectful, choosing fallen leaves, petals, sticks, seed pods, bark and more, but leaving all the living and growing things outside where they belong.
It was an absolutely beautiful day for a nature walk!
Back inside, we provided blank pages for the children to arrange their treasures, but instead of giving them glue or another way to stick everything together permanently, we made our creations temporary works - and encouraged our families to teach their children how to use camera phones to capture their pictures!
There was a lot of counting and lining up of materials, as well as some beautiful arrangements!
Here a grandmother is teaching her little one how to use the camera phone, and to email it to mom and dad at work! This is age appropriate use of technology, a way to use it to connect children and families. I LOVE IT!
Our caterpillars arrived this week, and we'll be watching them grow and metamorphose - we had out caterpillar books and magnifying glasses today.
We also put out a lovely natural sensory bin for our little ones to explore. I recently trimmed my rosemary bushes, and saved the fragrant leaves to use as a base for our bin. We added pretty pebbles, pine cones and shells. As the children searched through the bin, the rosemary leaves separated from their stems and released a beautiful scent. This was a sensory bin in more ways than one!
Small children seem to love collecting tiny things, and this group was no exception. They carefully collected every pebble, shell and pine cone from the rosemary, then sorted and explored them. (The long conical shells at the top of this picture turn out to be "unicorn horn shells". Who would have known?)
Seeing the kiddos sorting, we grabbed out some trays and had them work together to separate all the materials - wonderful for us, because we were planning to sort it all out to put it away when the children were done.
There was one more fantastic learning opportunity today, but I'm not a skilled enough photographer to capture it well: we introduced the children to maple seeds. If there was a maple tree anywhere in your neighborhood as a child, you may remember them as "helicopter seeds" - when tossed in the air they spiral down like little helicopters. I had collected hundreds of them while walking this last week, and the children were, of course, fascinated. There were 8 - 10 children at a time on the carpet throwing seeds up in the air, and laughing and jumping as they watched them spiral down.
Natural materials like these are free, just laying around at our feet, waiting for us to remember the wonder of being a child scientist, to joyfully explore and discover.
May all our days be filled with helicopter seeds, unicorn horn shells, and the laughter of children!
Wednesday, April 13, 2016
Celebrating Earth Day With Natural Materials
Earth Day is just around the corner, April 22nd. #Kinderfriends, a group of early childhood educators, decided to do a blog hop to showcase some of the fun ways we've found to celebrate Earth Day - thank you for stopping by!
I like to use natural materials with my kiddos whenever I can, so I thought I'd share some ways to use free, natural items from your environment to teach important concepts! The only item you need to provide for this is a way for students to contain their collection - a lunch sack or reused grocery bag works really well. Take a walk outside, and see what natural items your students can find! Have them make a collection of treasures.
My collection includes a variety of leaves and fallen flowers, plus some seed pods - but your collection will vary, depending on where you live. Your students might find rocks, sticks, pine cones, sea shells - what ever you have around your school or home will work!
Have students sort their collections into piles of similar things - they're working on sorting and classifying skills. How many different ways can they sort them?
Natural materials make excellent counters too. I found a lot of acorn caps in pairs - time to count by 2s. How about making groups of 10s and 1s, then figuring out how many items you have?
Maybe your students would rather make a design, like this mandala - and practice symmetry while they are at it.
For slightly older students, counting the individual items in a mandala will reveal multiples of the number of axis it has. For example, this mandala has 6 leaves, but 12 pink seeds and 12 crepe myrtle seed pods - because everything is in multiples of 6. Can they add items in another multiple of 6?
Designs don't have to be math inspired - check out these insects! While they are all symmetrical, this is also a great way to show understanding of other concepts that you've covered - such as insects have 3 body parts, antennae, and 6 jointed legs.
There are so many ways to use natural materials in our teaching and learning, I'd love to hear how you and your students integrate them into your Earth Day celebrations!
For more Earth Day ideas, continue the blog hop and check out the free ideas from our clever #Kinderfriends! Next stop: Class of Kinders
Subscribe to:
Posts (Atom)